A Complete Guide on How to Insert Image in Word

Adding a single image to Word only takes a click, but getting it to sit beside your text, fill the page, or stay in order when you add several takes a bit more know-how. This guide walks through all of it, plus how Kimi Docs can place and arrange your images automatically.

9 min read2026-07-22
How to insert an image in a Word document

Inserting an image in Word seems easy enough, but there might be issues: getting the image of sitting next to your text instead of pushing it down the page, filling an entire page without a stray margin, or adding several photos and having them land in the wrong order. This guide covers how to insert images in Word for each of these situations, starting with the basics and working through the more specific scenarios, helping you create Word files with correctly inserted and formatted images.

How to add pictures to Word documents

This is the basic process for how to add pictures to a Word document, whether you're inserting a JPG, a PNG, or another image format. The steps work the same on Windows and Mac, with one minor menu label difference noted in step 3.

Step 1: Place your cursor

Click in the document at the spot where you want the image to appear. Word drops the image at the cursor position, so placing it precisely before you insert it saves you from dragging it into place afterward.

Drawing 1

Step 2: Open the Insert tab

Click "Insert" on the ribbon, then select "Pictures" from the Illustrations group. A dropdown appears with several source options.

Open the Insert tab to add a picture in Word

Step 3: Choose your image source

Select "This Device" (or "Picture from File" on Mac) to upload a file from your computer. You can also choose "Online Pictures" or "Stock Images" to search for and insert an image without saving it to your device first. This is the same path whether you want to insert JPG into Word or any other image format.

Choose an image source in Word

Step 4: Select and insert

Browse to your file, select it, and click "Insert." The image appears at your cursor position, sitting inline with the surrounding text by default. At this point you can resize it by dragging the corner handles, or move it by clicking and dragging.

Insert an image into a Word document

How to position an image beside text

By default, Word treats an inserted image like a large character in the text. It pushes everything below it down the page rather than sitting alongside a paragraph. This is the most common frustration people run into after inserting an image, and it's controlled by a single layout setting. Changing it takes about three clicks and applies immediately.

Step 1: Select the image

Click once on the image you've already inserted to select it. Eight small handles appear around the edges.

Select an image in Word to change its position

Step 2: Open the Layout Options

A small icon appears just outside the top-right corner of the image. Click it to open the Layout Options panel. You can also right-click the image directly and choose "Wrap Text" from the context menu. Both routes lead to the same settings.

Open Layout Options for an image in Word

Step 3: Choose a wrapping style

Select "Square" to wrap text around the rectangular boundary of the image, or "Tight" to wrap it more closely around the actual shape of the image content. Either option lets the image sit beside a paragraph. "Through" and "Top and Bottom" are also available, but Square or Tight cover most everyday use cases where you want text running alongside the image.

Once you've set the wrapping, the image becomes a floating object. You can drag it anywhere on the page and the text will reflow around it automatically.

Choose a text wrapping style for an image in Word

How to make an image fill the full page or act as a background

These two goals, covering the full page with an image and setting an image as a page background, are handled the same way in Word. A full-page image placed behind text works as a background by default.

Step 1: Set margins to zero

Go to Layout > Margins > Custom Margins, and set all four margins to 0. Word will warn that this is outside the printable area on some printers. Select "Ignore" to continue. This removes the white space around the edges so the image can reach all the way to the page border.

Set margins to zero for a full-page image in Word

Step 2: Insert and resize the image

Insert the image using the steps in the section above, then drag a corner handle outward until the image covers the entire page. Hold Shift while dragging to maintain the aspect ratio and avoid distortion.

Resize an image to fill the page in Word

Step 3: Set the wrap style to Behind Text

Right-click the image, choose "Wrap Text," then select "Behind Text." The image drops behind the text layer, and any content on the page sits on top of it. This is how to insert picture in word full page with text remaining readable over it.

Set an image to Behind Text for a full-page background in Word

One note: this method applies the background only to the specific page where you placed the image. If you want a faded watermark-style image across every page of the document, Word's built-in Watermark feature handles that better. Go to Design > Watermark > Custom Watermark > Picture, and Word repeats it automatically throughout.

How to insert multiple images in order

When you select several files and insert them together, Word doesn't add them in the order you selected them. It adds them in alphabetical order by filename.

Step 1: Rename your files in the order you want them to appear

Before opening Word, rename your image files with a prefix number: 01_cover.jpg, 02_product.jpg, 03_team.jpg. This forces the alphabetical sort to match your intended sequence. It saves much more time than manually reordering images after they've been inserted.

Rename image files in sequence before inserting into Word

Step 2: Select all the images at once

Go to Insert > Pictures > This Device, navigate to the folder, and select all the images you want. Use Ctrl+A to select everything in the folder, or Ctrl+Click to pick specific files.

Select multiple images to insert into Word

Step 3: Insert and check the result

Click "Insert." Word adds every selected image in alphabetical order, one after another in the document. Review the sequence from top to bottom and cut and paste any image that needs to move.

Multiple images inserted into a Word document

If you regularly work with batches of images and the renaming step is a recurring friction point, the Kimi Docs section below covers a way to handle ordering and placement through a prompt instead.

Insert multiple images in order with Kimi Docs

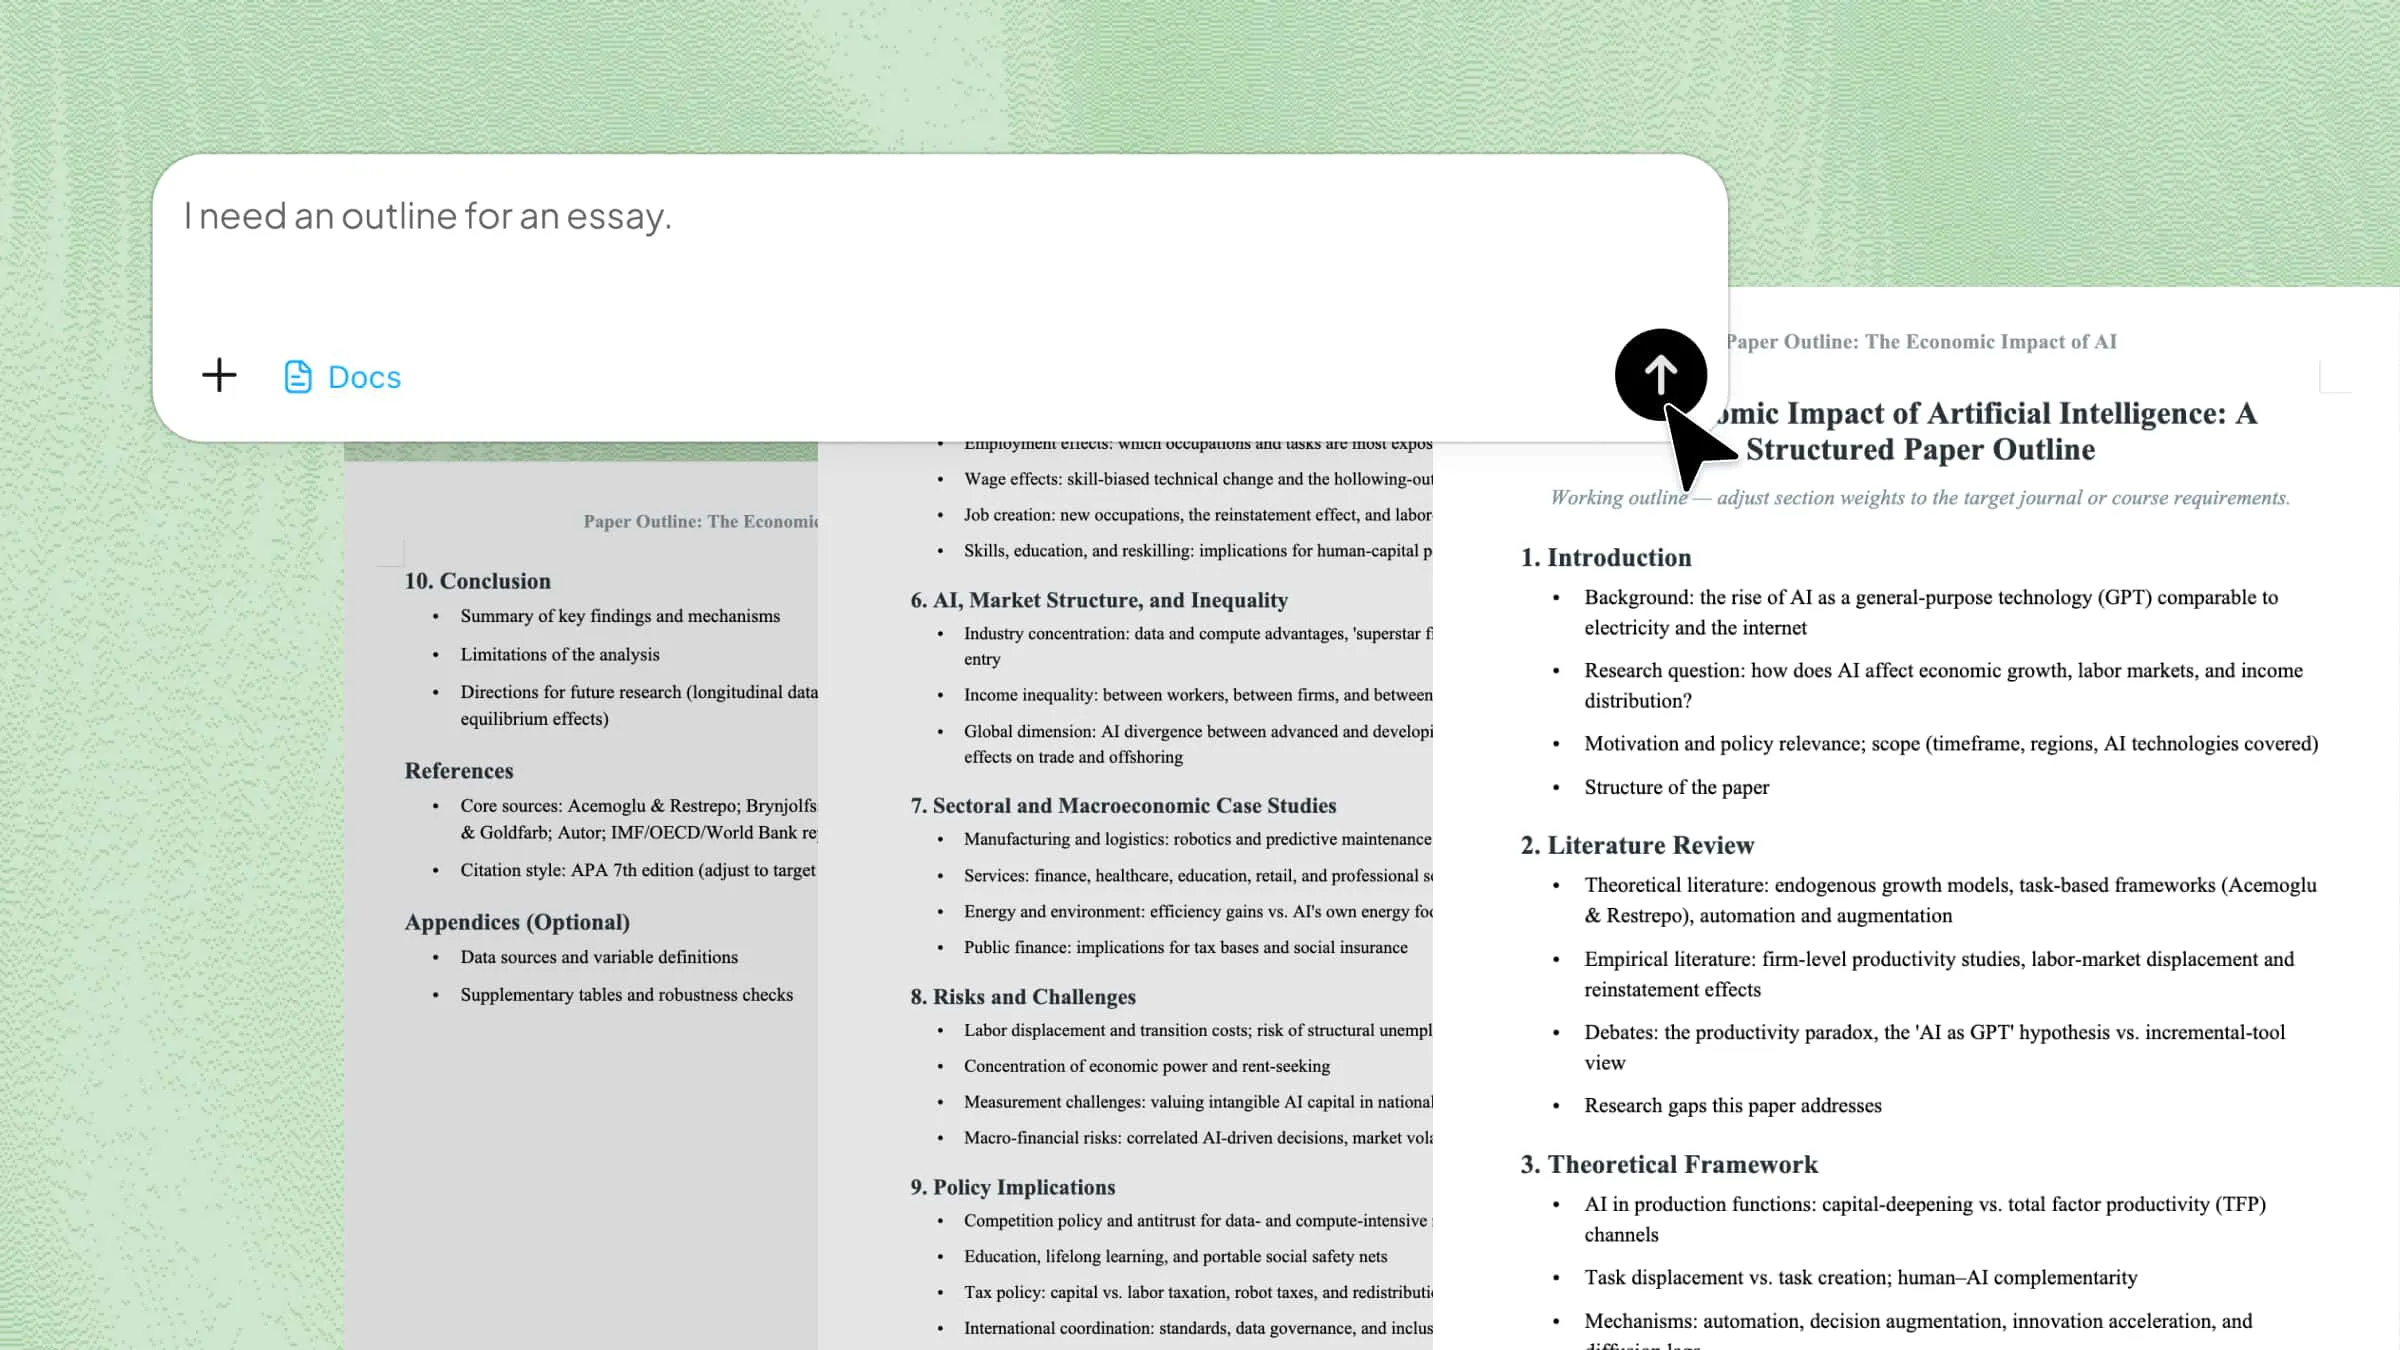
Designed to simplify complex file workflows, Kimi Docs functions as a smart AI document agent that handles text and visual media simultaneously. Going through the rename-insert-reorder cycle works for a few images, but gets tedious for larger batches. Kimi Docs skips it entirely: upload the document and images together, describe where each one should go, and get back a finished Word document with everything positioned correctly.

Step 1: Upload your images and the document

Upload your Word document along with the images you want inserted, in whatever filenames and order they happen to be saved.

Upload your Word document and images to Kimi Docs

Step 2: Describe the order and placement you want

Tell Kimi which image goes where, in plain language, instead of relying on filenames.

Example prompt:

Insert these images into the document in this order: image of the cover page first, then the product photo, then the team photo. Place each one after the relevant section, sized to fit the page width.
Enter a prompt to insert images in order using Kimi Docs

Step 3: Review and download

Kimi places the images as described and returns the finished Word document, ready to review or download.

Download a Word document with images inserted in order using Kimi Docs

Key features of Kimi Docs

  • No filenames to manage: Upload your images in whatever order they happen to be saved. Describe the sequence and placement you want in the prompt, and Kimi handles the positioning from there.

  • Placement by description: Tell Kimi where each image should go relative to your text, a section, a heading, or a specific paragraph, instead of inserting everything first and moving pieces around afterward. This removes guesswork from image placement in longer documents.

  • Intelligent sizing based on actual needs: Rather than defaulting to one fixed size, Kimi adjusts each image based on what you describe. If you need one image to span the full page width and another to sit beside a caption, both can be specified in the same prompt.

  • Handle large batches efficiently: Whether you're placing three images or thirty, the process is the same. Upload, describe, review. Larger batches don't require more steps, just a more detailed prompt.

  • Work across document types: Reports, brochures, resumes, and presentation documents all follow the same workflow. The number of images or the complexity of the layout doesn't change how you interact with the tool.

Conclusion

Inserting a single image in Word takes one click, but everything past that, positioning it beside text, filling a page, or keeping a batch in the right order, comes with its own set of steps. The Insert tab handles the basics, Layout Options control placement, and renaming files fixes ordering issues. For documents where images need precise positioning across the board, Kimi Docs handles it directly from a description, skipping the manual resizing and reordering altogether.

FAQ

How do I insert an image in a Word document?
Place your cursor where you want the image, go to the Insert tab, select "Pictures," choose "This Device" (or "Picture from File" on Mac), select your file, and click "Insert." The image appears at the cursor position and can be resized or repositioned from there.
How do I make text wrap around an image in Word?
Select the image, click the small Layout Options icon that appears outside the top-right corner, and choose "Square" or "Tight" wrapping. This changes the image from inline to a floating object that text can flow around.
How do I make an image fill the whole page in Word?
Set all page margins to 0 under Layout > Margins > Custom Margins, insert and resize the image to cover the full page, then right-click it, choose "Wrap Text," and select "Behind Text."
Why do my images insert in the wrong order in Word?
Word adds images in alphabetical order by filename when you insert multiple files at once, regardless of the order you selected them. Renaming files with a number prefix before inserting is the most reliable fix.
How do I add photos to a Word document on a Mac?
For how to add photos to Word documents on a Mac, the process is the same as on Windows. Go to Insert > Pictures > Picture from File, select your image, and click "Insert." The menu label differs slightly from Windows, but the steps are identical.
You Might Also Like
How to Edit Footer in Word: Easy Step-by-Step Guide
2026-07-22
A User-Friendly Guide to Convert JPG to Word with Smallpdf
2026-07-22
How to Insert a Section Break in Word: A Complete Guide
2026-07-22
How to Remove a Section Break in Word: 5 Ways
2026-07-22
How to Insert a Page Break in Word: 4 Ways
2026-07-22